
Photo by Icons8 Team on Unsplash
myEvolv NX*: Managing Scheduled Tasks – Simplified
-Dani Evans
KHIT is pretty amazing at making myEvolv work for your agency and your front end users. After several years of training multiple agencies, creating and adjusting tons of events and processes, one pain point I see frequently is what to do with scheduled tasks. We create workflows to help staff stay on top of their required “paperwork” and appointments and staff will schedule their own services.
If staff do not know what to do with the task once the event has been completed/cancelled/no longer applies, the tasks inevitably pile up and overwhelm sets in. The staff will not use their tasks and My Scheduled Tasks widget as the tools they were intended to be. Supervisory staff may see incomplete tasks and think the staff member is not completing their work in a timely manner. Cue Spiral.
As a trainer I have not always prioritized Scheduled Tasks. In the grand scheme of things, the tasks are relatively small potatoes when training new staff on the bigger things (like how to login and how to tell the difference between prod and dev). I’ve learned that managing the tasks isn’t always something that a frontend user will be able to figure out on their own often due to a fear of breaking something.
Give your coworkers the gift of confidence and show them how to use and own their scheduled tasks.
In my examples below, I am using a fairly simple workflow setup that schedules an initial assessment upon program enrollment and automatically reschedules annually.
While it is perfectly fine to utilize your My Scheduled Tasks widget, I am going to focus today on managing the tasks from the service entry page and/or assessments tab because tasks can be managed by more than just the person to whom they are assigned.
- Assessment Breadcrumbs: Client > Case Management > Service Management > Assessments
- Service Entry Breadcrumbs: Client > Case Management > Service Management > Service Entry
OPENING SCHEDULED EVENTS FROM SCHEDULED TASK
When you have a scheduled task and complete the scheduled event from the task, the next task will automatically schedule (if the event workflow is set up to do so).
From the Assessments Tab or Service Entry tab find your scheduled task and click Actions > Complete Task.

The event will open. Complete and save the event into the system.
- Save Early and Save Often
- If the scheduled event is complex with many required fields, use the Save Draft Feature. This feature is one of my favorite new(ish) Netsmart innovations.
- If you do not have the option to Save Draft, get in touch with your system administrator.
You can adjust the Days to Show Future Tasks filter appropriately to view the next scheduled event:
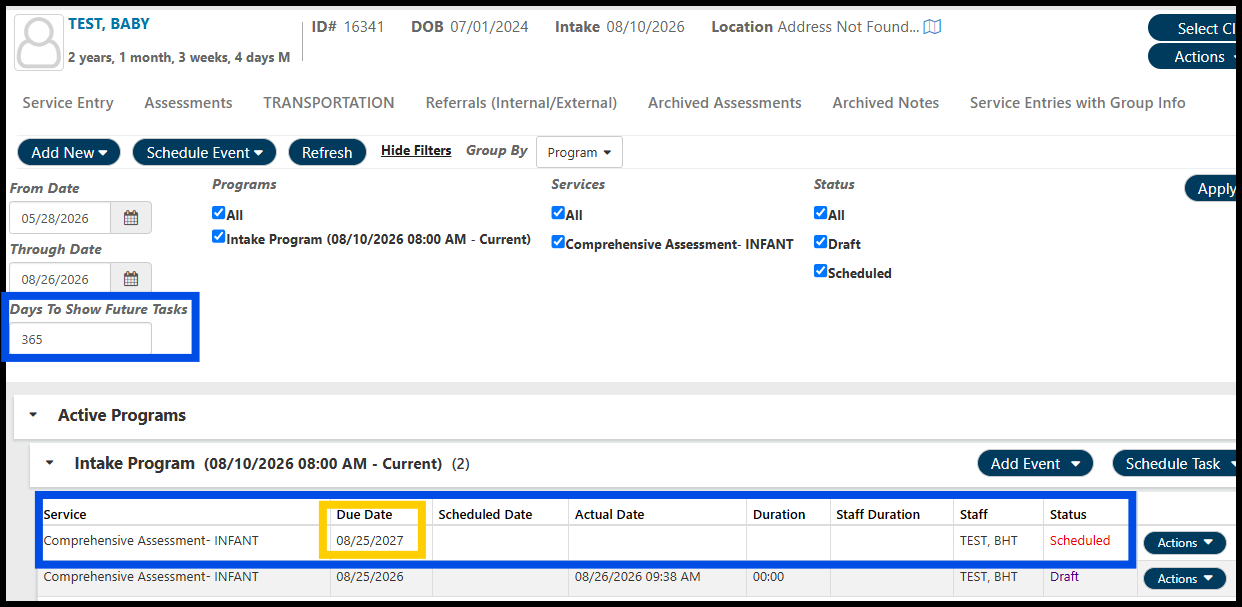
Or if the event was created as a Test/Assessment (as in this example), click over to the Assessments tab & click Refresh, to view the next auto-scheduled event.
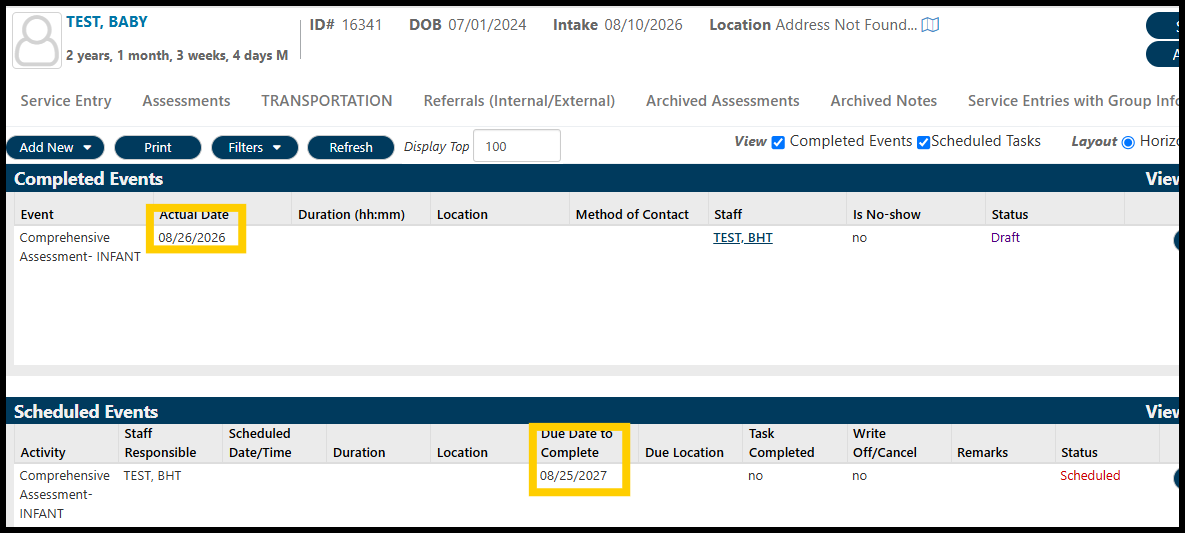
MARKING TASKS COMPLETE IF SCHEDULED TASK NOT USED TO COMPLETE SCHEDULED EVENT
If you forget to utilize the task to start the scheduled event, Calm Down. Marking the task complete after the fact is simple! In this example, you can see that the clinician started an assessment but did not use the scheduled task to complete the event because the Due Date to Complete field isn’t updated.

To mark a task complete when you did not use the scheduled task to start the scheduled event, click Actions > Edit Task
- This can be done from the Service Entry Page or the Assessments breadcrumbs
- If you do not have access to edit the scheduled task, reach out to your system administrator to adjust your security settings.
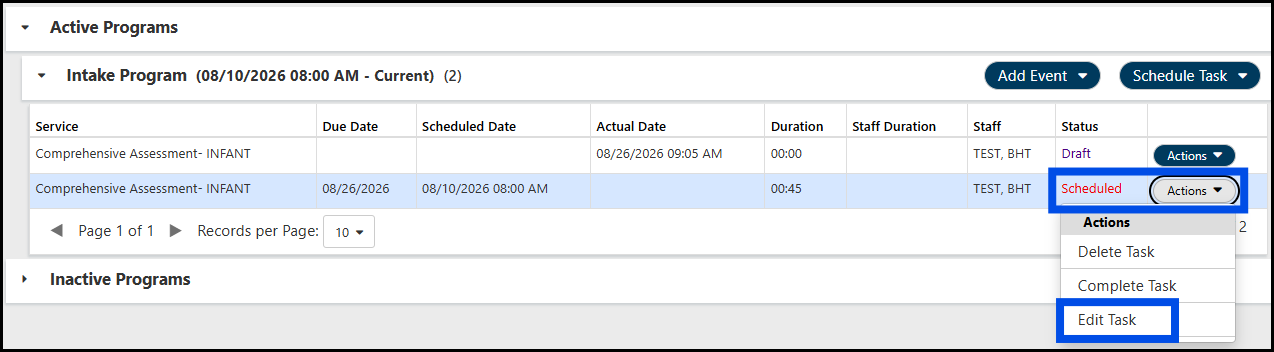
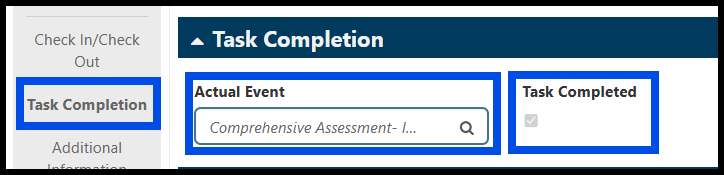
Scroll down to or click Task Completion on the left-hand menu.
Click the magnifying glass in the Actual Event Field to open a look up table that will include the completed event that matches the scheduled task. Click to select. If this task is recurring and this is not the first one completed, there will be a list of previously completed events that match the task. Check the Actual Date to make sure you are selecting the correct event.
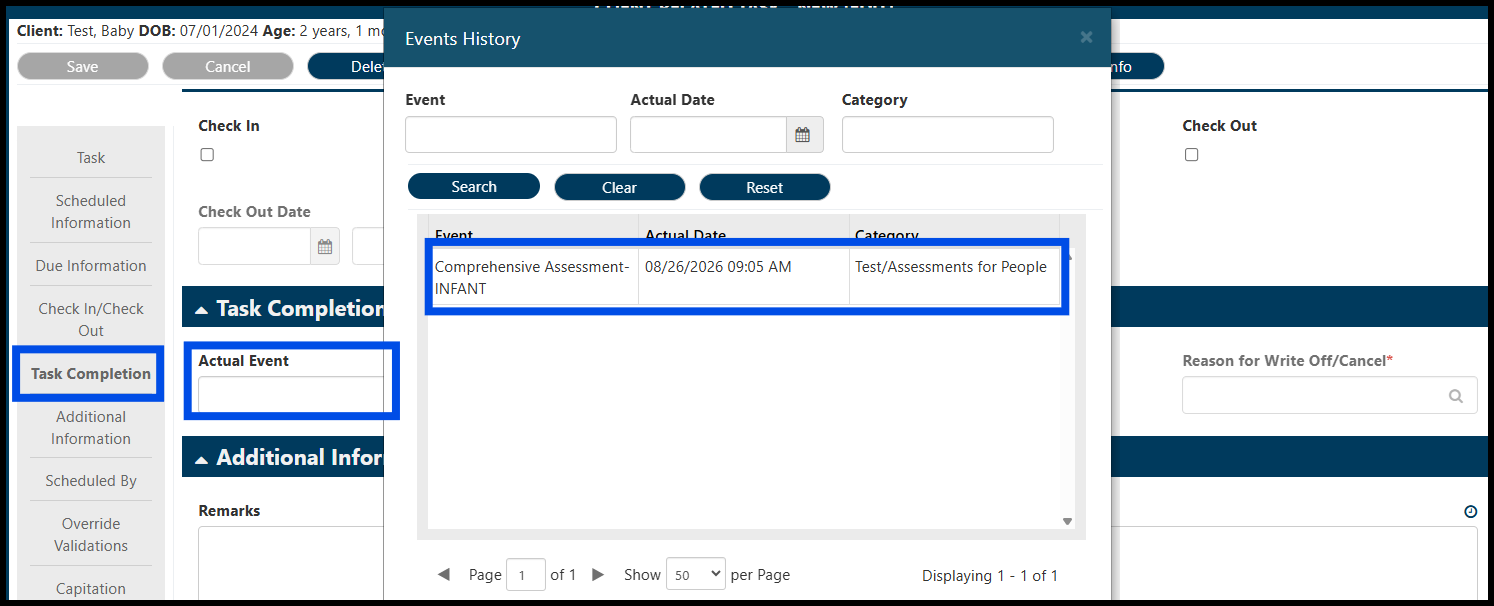 Once you select the correct actual event the Task Completed checkbox will be filled in. This checkbox tells the system that the scheduled event was completed and fire the trigger to schedule the next event.
Save in the upper left-hand corner of the window.
The task will drop from the service entry window.
- You can adjust the Days to Show Future Tasks filter appropriately to view the next scheduled event, or if the event was created as a Test/Assessment (as in this example), click over to the Assessments tab & click Refresh, to view the next auto-scheduled event.
You can adjust the Days to Show Future Tasks filter appropriately to view the next scheduled event:
Or if the event was created as a Test/Assessment (as in this example), click over to the Assessments tab & click Refresh, to view the next auto-scheduled event.
WRITE OFF TASKS (MAKE THEM GO AWAY) IF THEY NO LONGER APPLY TO THE CLIENT
- Service Entry: Actions > Edit
- Assessments Tab: Actions > Open Form
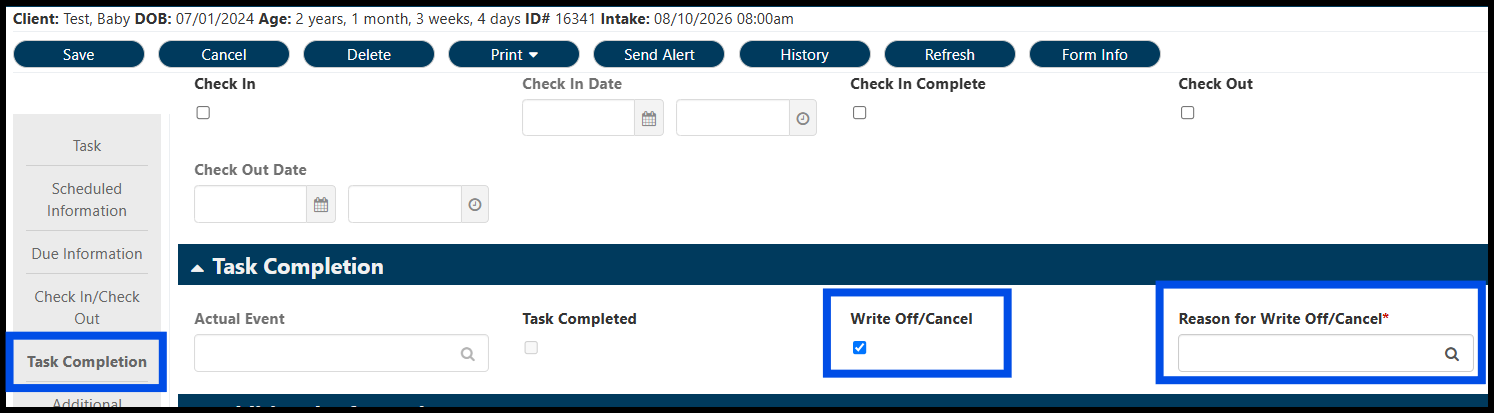
Scroll down to or click Task Completion on the left-hand menu.
Click Write off/Cancel & use the magnifying glass to complete the Reason for Write Off/Cancel
- If you do not see an appropriate selection in the Reason for Write Off/Cancel, reach out to your system administrator.
Save!
EDIT TASK INFORMATION
Do be careful with updating the task information! There may be fields on the scheduled task form that are not on the event you complete in the system. Some of these fields may or may not affect billing and reporting. Stick with editing fields on the scheduled task form that look familiar (otherwise you may feel the wrath of the billing department when they cannot figure out why something didn’t bill – tell them to call KHIT Consulting).
Include Scheduled Date/Time on a Scheduled Event
You have reviewed your scheduled tasks and wish to update the task with a scheduled a date/time.
- Service Entry: Actions > Edit
- Assessments Tab: Actions > Open Form
Scroll to or Click Scheduled Information on the left-hand menu.
Enter the date and time you’ve agreed upon with the client. You may be prompted to enter a tentative duration before you can save.
SAVE!

Change Staff Responsible
- Service Entry: Actions > Edit
- Assessments Tab: Actions > Open Form
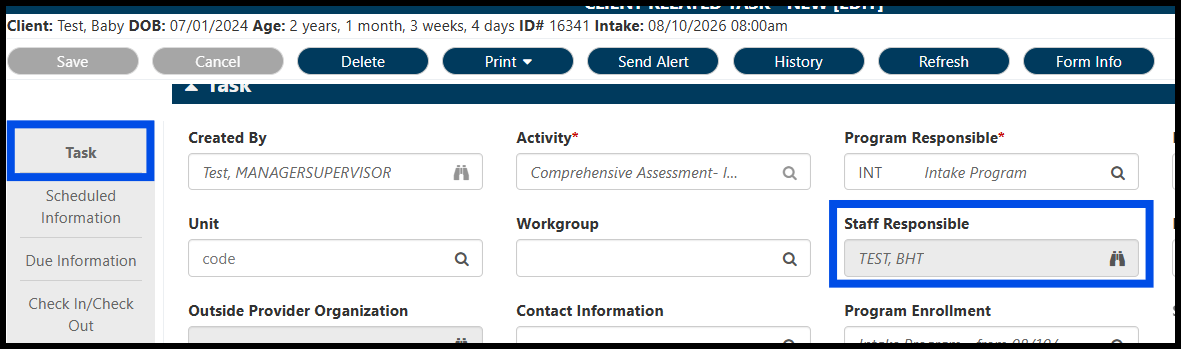
Task > Find Staff Responsible field
Use the little binoculars to search and select the new person responsible for making sure the scheduled event is completed.
Make sure to SAVE!
Questions? Contact us via email: [email protected]
*KHIT Consulting is not an affiliate of or associated in any way with Netsmart Technologies. Implement customizations at your own risk and test workflows and processes in development before implementing in production.
Netsmart does not support system customizations that are not outlined in their own documentation and resources. KHIT Consulting is not responsible for any negative outcomes as the result of your implementation of custom processes.
References to customizations are not really applicable in this case but, you know, just in case because lawyers and such.